
Common Walk-in Freezer Installation Mistakes and How to Avoid Them
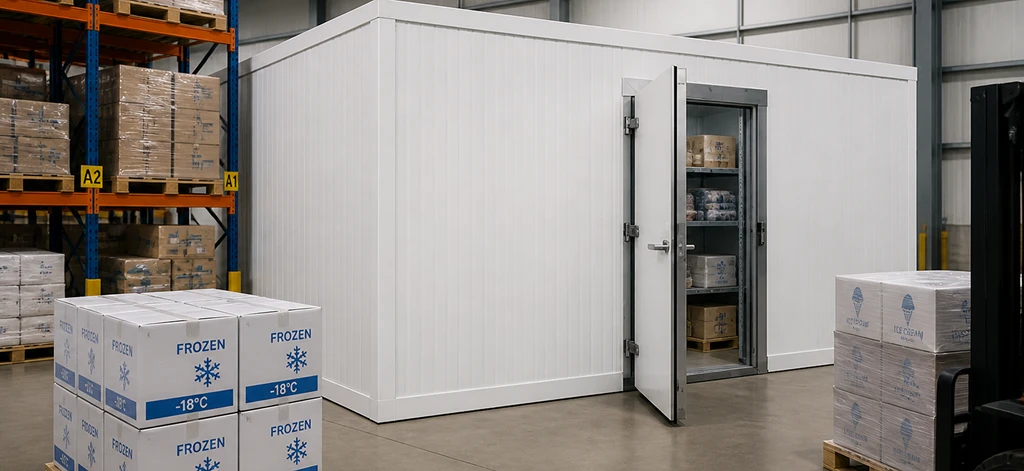
Setting up a commercial cold storage unit requires precision. In Ontario, Canada, food processors, grocery stores, restaurants, and warehouse operators know that a dependable cooling setup is the backbone of their business. However, errors during the assembly phase can cause massive operational problems down the road.
If you are setting up a new cold storage room, avoiding Walk-in Freezer Installation Mistakes is the most effective way to protect your physical infrastructure, ensure product safety, and prevent your energy bills from soaring. When business owners look up how to install a walk-in freezer, they often focus entirely on the mechanical cooling equipment. While the mechanical system is vital, a Walk-In Freezer is an integrated system in which the structural enclosure and the mechanical refrigeration cycle work together. If either side fails, you face major operational challenges.
Partnering with an experienced Refrigeration Company – COLDMOOSE ensures that your system functions efficiently and complies with Canadian regulations. This comprehensive guide breaks down the most common walk-in freezer mistakes, uncovers hidden walk-in freezer setup mistakes, and provides practical strategies to complete your walk-in freezer installation perfectly the first time.
Structural Enclosure and Panel Assembly Errors
The physical envelope of your cold room determines its structural integrity and insulation efficiency. Many walk-in freezer installation problems start right here, with the assembly of the thermal envelope.
Choosing the Wrong Insulation Thickness
A frequent mistake during the initial commercial walk-in freezer installation planning phase is treating a freezer exactly like a standard Walk-In Cooler.
Walk-In Cooler vs Walk-In Freezer Panel Requirements
| Component | Walk-In Cooler | Walk-In Freezer |
| Temperature Range | 1.6°C to 5°C (35°F to 41°F) | -18°C to -23°C (-0°F to -10°F) |
| Typical Panel Thickness | 3-inch panels | 4-inch to 5-inch panels |
| Purpose | Fresh food preservation | Deep freezing and long-term storage |
Because of this intense temperature differential, freezers require 4-inch to 5-inch thick freezer insulation panels to maintain adequate thermal performance.
Using thin panels causes the system to run constantly, driving up energy bills and shortening the lifespan of your mechanical components.
Poor Insulated Panel Installation and Cam-Lock Gaps
Modern cold rooms rely heavily on Insulated Metal Panels (IMP Panels) filled with high-density foam. COLDMOOSE structures use high-grade Polyurethane Insulated Panels equipped with internal locking mechanisms called Cam-Lock Panels.
During the insulated panel installation, installers must use a hex wrench to pull these panels together until they lock tightly. If the panels are misaligned by even a fraction of an inch, the cam-locks will not pull them into a complete seal. This leaves microscopic gaps between panels, creating thermal bridges where heat from the outside building migrates into the cold zone.
Over time, these small gaps allow moisture to leak into the insulation, where it freezes, expands, and permanently destroys the structural panel core.
Neglecting Floor Insulation and Vapor Barriers
One of the most destructive walk-in freezer setup mistakes involves ignoring what happens underneath the unit. It is easy to assume that a solid concrete floor is sufficient, but thermodynamics creates unique structural challenges below freezing temperatures.
Skipping the Freezer Floor System
While a standard Walk-In Cooler can often be built directly on an uninsulated building floor, a freezer absolutely requires a dedicated Freezer Floor System with robust Floor Insulation. If you skip these floor insulation requirements, the sub-floor concrete will lose heat to the freezer room continuously.
Over several months, the moisture trapped in the soil directly beneath the concrete slab freezes into ice. As the ice expands, it pushes upward with immense pressure, cracking the concrete slab and destabilizing the entire structure. This destructive process is known as frost heave, and fixing it requires tearing out the entire freezer.
Flawed Vapor Barrier Installation
Moisture moves from warm, humid areas toward cold, dry spaces via a process called vapor drive. In Ontario’s humid summers, warm air pushes relentlessly against the cold exterior walls of your freezer.
To stop this moisture migration, a continuous Vapor Barrier must be installed on the warm side of the freezer insulation panels before assembling the floor and walls. Mistakes during the vapor barrier installation, such as using thin plastic sheeting, missing lap joints, or failing to seal punctures, allow warm, moist air to bypass the defense layer.
Once that vapor reaches the sub-zero interior, it transforms instantly into frost, compromising your insulation panels and causing ice accumulation across the floor.
Errors in Refrigeration Load Calculations and Sizing
A walk-in freezer is only as good as the mechanical system cooling it. Sizing errors during the initial engineering phase can create long-term operational problems.
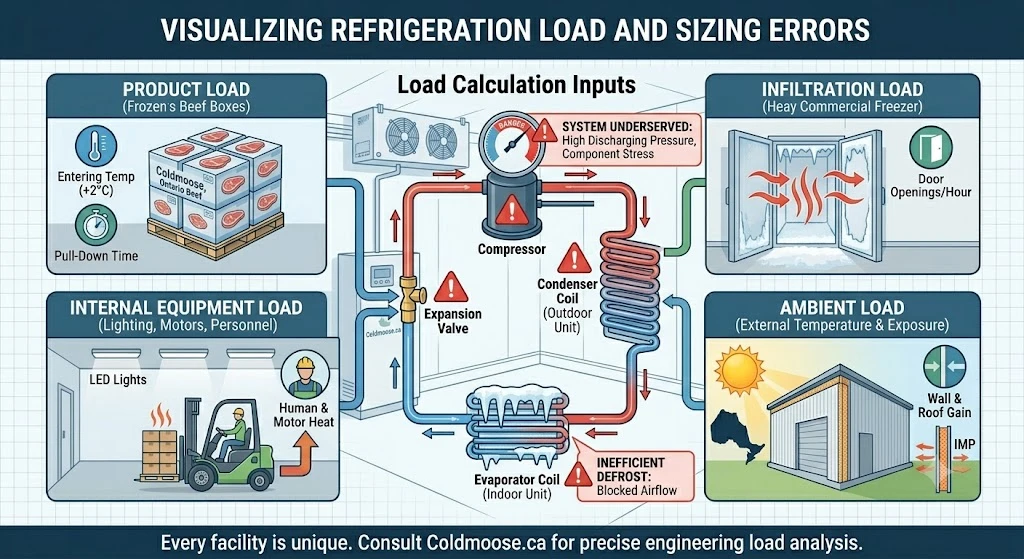
The Refrigeration Cycle
Inaccurate Refrigeration Load Calculations
A common mistake is selecting a cooling system based entirely on square footage. True refrigeration load calculations require a comprehensive look at multiple variables, including:
- The exact volume and entering temperature of the food products.
- The ambient temperature of the surrounding room.
- The number of door openings expected per hour.
- The heat is generated by interior lighting and forklift traffic.
Undersizing the equipment means your freezer will struggle to hold its target temperature, threatening food safety.
Conversely, oversizing causes the system to short-cycle, turning on and off rapidly, which strains the electrical components and prevents the system from running long enough to manage humidity effectively.
Component Mismatches
A complete system requires careful matching of four primary components:
| Refrigeration Component |
|
|
|
|
If an installer pairs a high-capacity compressor with an undersized evaporator coil, the system cannot absorb heat efficiently. This mismatch unbalances the refrigeration cycle, causing liquid refrigerant to flood back down the Refrigeration Piping and damage the compressor valves.
Poor Placement of Evaporator and Condenser Units
Where you position your equipment matters just as much as how you size it. Improper placement blocks critical airflow and forces the system to work harder than necessary.
Poor Evaporator Placement and Blocked Airflow
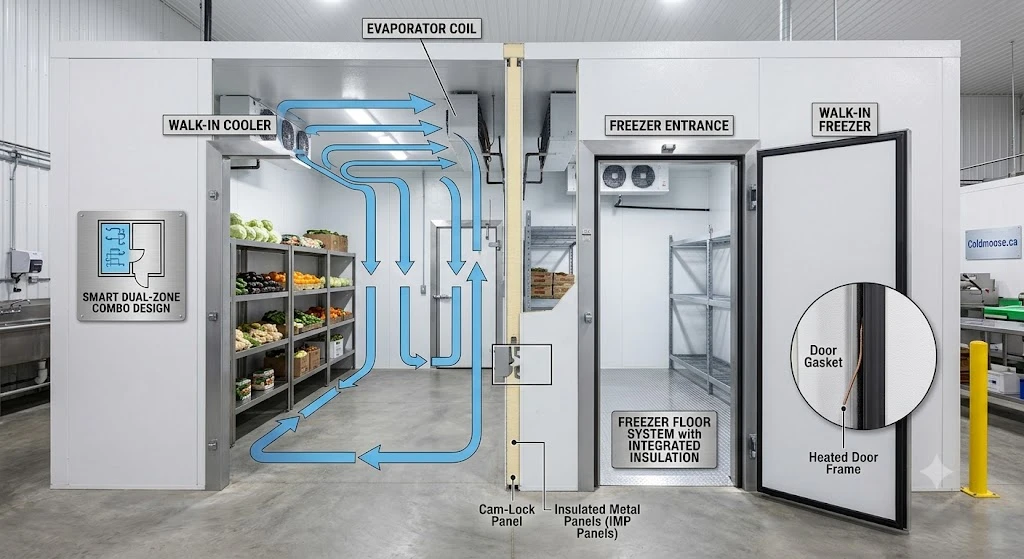
The indoor evaporator unit draws warm air out of the room and blows chilled air back across your inventory. A frequent mistake during refrigeration system installation is mounting the evaporator directly over the main entry door or tucked tight into a corner.
Placing it over the door causes the fans to suck warm, humid outside air straight into the cooling coils every time someone walks in, leading to rapid frost build-up on the fins. Tucking it too close to a wall blocks proper airflow for refrigeration, creating localized hot spots where food can spoil.
Correct Airflow Design
Ignoring Ambient Temperature Considerations
The outdoor condensing unit must reject the heat gathered from inside the freezer into the surrounding air. If you mount the condenser in a tight room without proper exhaust ventilation, or too close to a hot roof surface, the ambient temperature surrounding the coils rises quickly.
These severe ambient temperature considerations lower the unit’s cooling capacity. In Ontario, your outdoor condenser must also feature built-in winter controls (low-ambient kits) to ensure the system operates reliably when winter temperatures drop far below freezing.
Door Installation and Gasket Sealing Faults
The door is the only moving part of the thermal envelope, making it a primary point for air leaks and energy loss.
Faulty Freezer Door Installation and Alignment
Because freezer doors are thick and heavy, they put significant stress on the surrounding frame. If the frame is not perfectly plumb and level during the freezer door installation, the door will sag over time.
Even a tiny misalignment prevents the soft Door Gasket from making full contact with the frame, allowing cold air to pour out and warm air to rush in.
Failing to Connect the Heated Door Frame
Because a freezer operates well below water’s freezing point, any moisture that touches the door frame will instantly freeze. Freezers require a continuous Heated Door Frame containing low-wattage heater wires to keep the frame temperature just above freezing.
Forgetting to wire this heater during installation allows ice to form around the perimeter. This ice build-up can glue the door shut, and pulling hard on a frozen door will tear the rubber gasket apart.
Overlooking Drainage Systems and Regulatory Compliance
The final phases of a project involve setting up plumbing lines, calibration, and ensuring the workspace meets local building and health codes.
Poor Design of Freezer Drainage Systems
During the automatic defrost cycle, the evaporator coil melts away accumulated frost, generating liquid water that must drain out of the room. A common error is installing standard PVC drain lines without an integrated heat trace wire.
Because the drain pipe passes through a sub-zero freezer room, the wastewater will freeze inside the pipe, creating an ice block. The next time the system defrosts, the water cannot escape and backs up, overflowing the drain pan and coating your freezer floor in a dangerous layer of ice.
Skipping Smart Temperature Monitoring Systems
Relying entirely on a basic mechanical dial thermometer on the outside wall leaves your business vulnerable to hidden system failures. Modern operations require automated temperature monitoring systems.
These digital systems log data continuously and send instant SMS or email alerts to your phone if temperatures rise above safe limits, allowing you to save your high-value inventory before it spoils.
Ignoring Regulatory Compliance (HACCP, CFIA, OHS)
A commercial Cold Storage Facility must comply with strict federal and provincial regulations.
Regulatory Compliance Requirements
| Regulation | Requirement |
| HACCP (Hazard Analysis Critical Control Point) | Continuous temperature tracking and smooth, easy-to-clean panel surfaces |
| Canadian Food Inspection Agency (CFIA) | Food-safe materials, sanitary finishes, and clean layouts |
| Occupational Health and Safety (OHS) | Interior safety releases, clear pathways, and non-slip floors |
The Master Walk-in Freezer Installation Checklist
To ensure your installation proceeds smoothly, use this step-by-step framework during construction.
| Step | Activity |
| Step 1 | Site Preparation and Floor Insulation |
| Step 2 | Wall and Ceiling Panel Assembly |
| Step 3 | Mechanical Equipment Mounting |
| Step 4 | Refrigeration Piping and Electrical Wiring |
| Step 5 | Door Hang and Auxiliary Component Setup |
| Step 6 | Controls Calibration and Compliance Check |
Step 1: Site Preparation and Floor Insulation
Verify the sub-floor is level and flat. Lay down a continuous vapor barrier over the raw concrete slab, install rigid floor insulation panels, and pour the finish wear slab or place the heavy-duty interior freezer floor panels.
Step 2: Wall and Ceiling Panel Assembly
Erect the corner panels first to establish square walls. Assemble the remaining insulated metal panels using the cam-lock system, ensuring each connection locks tight without gaps. Apply food-grade silicone sealant along every interior joint.
Step 3: Mechanical Equipment Mounting
Mount the interior evaporator coil away from the entry door to ensure clear refrigeration airflow. Place the outdoor condensing unit in a well-ventilated space that accounts for local ambient temperature considerations.
Step 4: Refrigeration Piping and Electrical Wiring
Run clean copper refrigeration piping between the compressor, condenser, expansion valve, and evaporator. Solder the connections using dry nitrogen to prevent oxidation, pressure-test the lines with nitrogen, and pull a deep vacuum to remove moisture before charging the system with refrigerant.
Step 5: Door Hang and Auxiliary Component Setup
Hang the heavy-duty freezer door, checking that it sits plumb and true. Wire the heated door frame and verify the door gasket seals tightly around the entire perimeter. Install the copper drain line with an internal heat trace wire and pipe it outside the cold room.
Step 6: Controls Calibration and Compliance Check
Install your automated temperature monitoring systems and calibrate the probes. Run the system through multiple full cooling and defrost cycles to ensure the mechanical hardware operates smoothly and complies with CFIA, HACCP, and OHS standards.
Designing a Smart Dual-Zone Layout
For many businesses in Ontario, installing two separate units takes up too much floor space. If your facility handles a mix of fresh daily shipments and long-term frozen inventory, a Walk-in Cooler & Freezer Combo is often the most practical solution.
This design positions the freezer door inside the cooler room. This smart layout ensures that when staff open the freezer door, it only exchanges air with the pre-chilled cooler environment rather than drawing warm, humid warehouse air into the freezer.
This step reduces frost accumulation on your evaporator coils and cuts down on overall energy consumption.
Protect Your Investment with Professional Installation
Building a cold storage space requires balancing structural design, thermal insulation, precise mechanical engineering, and local regulatory standards. While DIY kits might look appealing to save money upfront, a single mistake like a skipped vapor barrier or an unbalanced refrigeration cycle can lead to thousands of dollars in spoiled inventory, high utility bills, or structural damage from frost heave.
Working with a professional walk-in freezer installation team guarantees that your system is sized accurately, assembled correctly, and built to last. COLDMOOSE handles the entire lifecycle of your cold storage project, from custom load calculations and manufacturing to final commercial setup and ongoing maintenance across Ontario.
Ready to design an efficient, durable cold storage room for your business? Contact the refrigeration experts at COLDMOOSE to get an accurate quote and construct a system tailored to your daily operations.
Avoid common setup errors to ensure your commercial freezer operates at peak efficiency while eliminating the risk of premature structural or mechanical failure. By partnering with us for a professional installation, Ontario businesses secure a durable, energy-efficient system that fully complies with Canadian regulations. Don’t risk your inventory on DIY guesswork; invest in expert precision to keep your cold chain safe and reliable for years to come.
Frequently Asked Questions
Q. What type of lighting should be installed inside a walk-in freezer?
Low-heat LED fixtures designed for sub-zero temperatures prevent extra thermal load and remain highly energy-efficient.
Q. How much physical clearance is required between the freezer exterior and warehouse walls?
Leave a minimum of 2 to 4 inches of airspace around the outer walls to ensure proper ventilation and prevent condensation build-up.
Q. How long does a standard professional walk-in freezer installation take to complete?
Most commercial installations take between 2 and 5 days, depending on the box size, floor setup, and piping complexity.